One of those projects. One you want to get just right. You pick it up every so often, fiddle with it, glue a smidgen, sand a minute amount, touch up paint here and there... and then put it away. The Predator Annihilator below is that project for me, going on two years or so now. I'm overly meticulous with the hobby regardless, but for some unfathomable reason I am especially neurotic about this one model.
Relatively standard fare here. Forge World reinforced armor, subtle metallic gunmetal highlighting (still very much in-progress), some additional plasticard plating, and lovingly customized lascannons. Those cannons are the penultimate example of how I approach the craft, for better or for worse. Like those lascannons, most of my custom work is extremely subtle... even unnoticeable to the casual observer.
Many hours were spent crafting those barrels to my demanding satisfaction, and had I not pointed it out I doubt few would have spotted the difference. The result is perfect in my estimation, but exactly why I will never be able to churn out models with any rapidity.
The additional plating on the fore (where the Rhino windows would be) has some rivet detail. That's significant as I don't generally do rivets, for a number of reasons. It's easy to overdo, it can be difficult to stay true to scale and not have rivets the size of a (scale) human's fist, and it's crazy time-consuming. However there are some instances where I believe rivet detail is necessary, and this is one as the plate would just appear to bare without them. Helps it mesh with the rest of the model. Some modelers carefully glue punched plasticard, some utilize the bead method, my method is straightforward and relatively simple ...
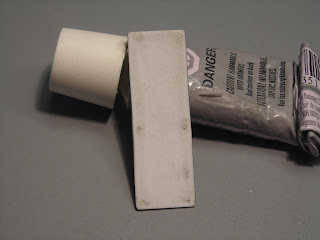
The materials consist of plasticard, pin vice, and generic plastic model contour putty (Testor's, in this instance). Mark out the desired locations for the 'rivets' beforehand, and then score the 'dots' with a X-acto knife to give the pin vice a guide hole. A couple of twists with the tip of the blade is more than sufficient. Place the plasticard face down on a folded paper towel and go to work with the pin vice until you've punched through. A couple extra twists to clean the hole, some minor knife work to remove the 'flash' created around the hole edges, and some fine grit sanding around the hole to smooth the whole thing out.
Now you have a choice. You can leave as-is, and it makes perfectly acceptable "recessed" rivets (check out the additional plates on the Predator pic above, just above/behind the headlights for reference). Or you can take it one step further to acquire the "bulge". This part is ridiculously simple.
Smear a small amount of the contour putty on the backside of the plate, over the hole. Tiny amount of pressure and the putty squeezes though, leaving a "bubble" on the visible side. When creating multiple rivets, be cautious not to fat finger and smear your previous work, as the putty takes several hours to solidify. And that's all she wrote. Let dry, carefully sand off the backside and touch up the visible side as you feel appropriate. Paint to taste. The center front plate in the picture above is a completed example.
This has been one of my rare tutorials, hope all three of you who read this blog find it of use. Admittedly it's not an incredibly complicated subject, but it does save me a huge amount of time with good results.
And time is something we all wish we had in abundance, but never do.
I am back, friends, the Shenanigans are resuming!
3 months ago


0 comments:
Post a Comment